Boost Engagement Around the Holidays with Scavenger Hunts

Saturday, December 8, 2018 1 comment

One way I LOVE boosting engagement is through the use of scavenger hunts. I have started placing them strategically right before breaks, on holidays, and on typical crazy days so that crazy days become crazy productive instead of just crazy!

Creating a scavenger hunt for your kiddos does NOT have to be difficult, and my goal of this blog post is to share a few tips and tricks that will make creating and implementing scavenger hunts even more easy for you to do in your classroom.

There are two main types of scavenger hunts I like to use in my classroom - around the classroom and around the school. My kiddos are obsessed with the around the school scavenger hunts, but if you aren't ready to release your kiddos into the school, simply do the scavenger hunt in your own classroom - it will still be just as FUN.

How to create your own around the school scavenger hunt:

1) Grab or create a set of task cards. I choose to do between 8-10 task cards. I aim to make them more challenging since there are fewer of them. Print however many you need for each group to have one and place them in large envelopes.

2) Develop clues that your students will solve in order to find the next task card. I have created different riddles students have to solve, and I've also just scrambled up words that students have to unscramble. You can scramble words such as "cafeteria" or you can scramble teacher's names. Print enough of each clue for each group to have one.

3) Write the answers to each task card on the outside of a small envelope and place one set of clues inside each small envelope.

4) Lay out the large envelopes and place the corresponding small envelope on top.

5) Step five is the MOST IMPORTANT step! = ) After everything is laid out, move each small envelope to the right one space. This movement creates a loop. If you don't create this loop, the scavenger hunt won't work.

6) After you've moved each small envelope, write the location of the clue in the small envelope on the back of the large envelope it is on top of - this is reminding you were you need to hide the large envelope.

7) Hide the large envelopes around the school and place the small envelopes on the board. At this point, you are ready to go hunting! = )

*I choose to add a joke that students have to solve to my scavenger hunts. Please look at my products to see an example with how I did this. = )

Pre-Created Scavenger Hunts: 

If you don't want to create your own scavenger hunts, I have already created some really fun scavenger hunts for several different holidays. You will still have to create the loop, but each product includes detailed directions on how to do this. All three products are fully editable so that you can create your own questions if you don't teach 4th/5th grade. = )

This Thanksgiving Scavenger Hunt includes a mixture of adding/subtracting/multiplying/dividing whole numbers, along with some decimal practice, but the product is fully editable in case you would like to create your own problems. CLICK HERE to learn more.

The Christmas Scavenger hunt includes a variety of math skills including: ordering decimals, adding decimals, multiplying decimals, and multiplication and division of whole numbers, but the product is fully editable in case you would like to create your own problems. CLICK HERE to learn more.
 

The Valentine's Day scavenger hunt includes: adding, subtracting, multiplying, and dividing decimals, but the product is fully editable in case you would like to create your own problems. Click HERE to learn more. *Some problems are two step.


A Gift Your Students Will ORBEEZ-lutely LOVE!

Tuesday, November 20, 2018 No comments
Looking for a cheap gift for an upcoming holiday that your students will still LOVE? My kiddos are currently obsessed with Orbeez, or water beads. Why? I'm not so sure. They are typically used in water tables and as sensory toys, but my 5th grade kiddos are absolutely LOVING them. My 5th graders love them, so I feel certain that any kiddo grades K-5 would think these are the most perfect gift. 

This year I have 26 kiddos so I bought one box of Ziploc baggies, two bags of Orbeez (water beads) for $6.99 each, and printed enough gift tags for each kiddo to get one. These gifts came in at less that 70 cents per kiddos - can't beat that! 

Making these Christmas gifts for your kiddos is SO SO easy. Simply grab Orbeez and baggies off of Amazon, download the gift tag FREEBIE from TpT and add your name to the editable portion of the gift tag. Print enough for your kiddos and add both the gift tag and the directions to a Ziploc baggie with one spoonful of Orbeez. 

Do you have a super fun, but easy and cheap Christmas gift idea?!
I'd love to hear it in the comments below! = )

HAUNTED HOUSE Transformation: Halloween FUN!

Wednesday, October 3, 2018 4 comments
Halloween is one of my FAVORITE days in the classroom! It used to be a day of chaos and candy, but now it’s a day of engagement and FUN! Last year for Halloween I transformed my classroom into a haunted house using a few cheap supplies from Walmart, and did three fun stations that kept my kiddos busy all day! Keep reading for ALL the details and a complete breakdown of every thing I used to make Halloween SPOOKY and FUN!

THE DECOR:

Making my classroom look like a Haunted house was really quite simple. I love transformations when the lights can be turned off because decorating is that much easier! I started off by covering the windows with some black butcher paper in order to get it as dark as possible. I wanted to be able to use the tables throughout the day so I kept them where they normally are and I simply covered them with black tablecloths and added some fun decorations to the top - spiderwebs and spiders. I hung fake spiderweb literally EVERYWHERE and turned on a couple disco lights to set the mood. I also turned my under board LED lighting to green, and turned on a couple black-lights. I asked parents to help with classroom decor since I wasn't asking for party supplies! I sent home a list of items I needed a couple weeks before the transformation and got everything I needed. I made sure items were cheap and easy to grab at Walmart or Dollar General.

Supplies I asked for:

Black tablecloths, spiderwebs (LOTS of them), plastic spiders, 6 black bowls, candy corn, and toothpicks, food items needed for fear factor (noodles, cabbage, rice, raisins, oil, etc.)

Items I already had:

black lights, blacklight flashlights, and a strobe light

THE STATIONS:

STATION 1: FEAR FACTOR Math -

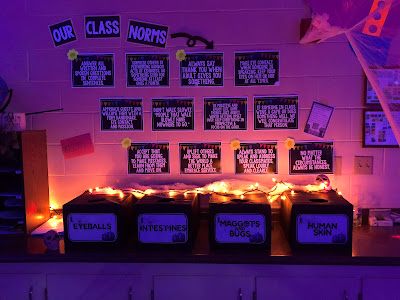
EYEBALLS, INTESTINES, SKIN, MAGGOTS & BUGS... OH MY!

Do your students have the courage to reach in and find a task card for their group? For this station students simply took turns reaching in and grabbing out a math task card for their group to solve. I made two sets of task cards for each box, which allowed me to differentiate my groups. These task cards are simply computation. The looks on my kiddos faces when they reached into these boxes was THE BEST! It made the peeling of grapes that took place long after my bedtime the night before the transformation totally worth it! Ha!

What you will need to create fear factor math in your classroom:

I created four different fear factor boxes.
Intestines – Spaghetti noodles/oil
Maggots/Bugs- Overcooked rice/raisins/oil
Eyeballs – Peeled grapes/oil
Human Skin – Cooked cabbage
 (There are lots of other options online.)

You will also need four boxes to put each of these in and wet wipes and paper towels near by.

How to set up fear factor: Prepare each different type of food and place in separate plastic boxes. Cut and laminate task cards for each box and mix them into the food items. Find four boxes that can be placed on top of the plastic boxes that contain the fear factor items. I used copy paper boxes that we had lying around the school. I just used the bottom portion of the box and flipped them over on top of the plastic containers. I cut a hole just large enough for a hand in the middle of the bottom of the box (which becomes the top when flipped over).
**GRAB MATH TASK CARDS HERE. The pack includes 4th and 5th grade level task cards, along with an editable file so that you can create your own task cards and box labels in case you want to do something slightly different than what I did!

STATION 2: BEAN BOOZLED MATH

For this station, students played bean boozled. To set this station up, I grabbed the bean boozle refillable packs on Amazon and printed (and laminated) the spinner off of google. I put the beans in a black bowl and positioned it in the middle of the table. Students took turns drawing task cards. Students would ALL solve the task card and discuss the answer. Once everyone had the same answer, the person who picked the task card then got to spin the bean-boozled wheel. Kiddos LOVE gross things, so they thought that this game was AMAZING!

*Please note that I did NOT make any student participate in the eating of the jelly beans if they didn't want to! ... and you will definitely want to keep a trash can near by. = )


You can grab the task cards I used HERE on TpT. They can be used for simple practice or another game if you don't want to use them for Bean Boozled.

Items needed to do Bean-Boozled Math in your classroom: Bean BoozledJelly Beans (and a spinner – I printed a spinner off the internet), task cards, paper towels, and a trashcan

STATION 3: NEON-READ ON


For this station, I used Hope Kings Neon – Read On Resources with a Halloween passage. You can learn more about her activity by checking out her blog HERE or by attending a Get Your Teach On conference!

Items needed to do Neon Read On in your classroom: Blacklight flashlights, highlighters, and a passage.

STATION FOUR: SKELETON FLINGERS

*Using context clues task cards.
This year I added a fourth station using Skeleton FLINGERS I found in the Target Dollar spot. Students will solve a reading task card and then fling a skeleton onto a Target to earn points for their team! Check back for photos of this station! If you can’t find flingers in your dollar spot, you could simply pair reading task cards with any Halloween themed game. =)


Winter Games: A Classroom Transformation

Saturday, February 24, 2018 6 comments

Amazon Affiliate links are provided in this blog post for your convenience.

Guys. I am SO excited to write this blog post for you guys. For the past two days at school, my fifth graders have taken part in the 2018 Winter Games. We did these games to go along with this year's Olympic Games, but it could totally be done anytime during the winter months by just calling them the Winter Games. Myself and my coworkers are already talking about doing this transformation again next year with the title of the "Winter Sports World Championship". It doesn't have to be Olympic themed to still be SO MUCH FUN. During this blog post, I'll break down what we did and how we decorated. If you have any questions, don't hesitate to leave a comment and I'll get back to you.

The Decorations: 
The decorations for this transformation were cheap and easy (YESSSS!). I spent less than $50 on all of my supplies. I bought 11 tablecloths, and five packages of streamers from the dollar store for a dollar a piece (Totaling less than $18). Since we did Olympic themed, I bought everything in Olympic ring colors, but if you are just doing Winter Games themed, you could buy any time of fun colors! I also bought a world flag banner from Amazon that was AWESOME quality and super fun! I am already trying to think of another way I can use this awesome banner! I also have some fun disco lights that I leave up all year and turn on for special events like these. They are also from Amazon and I LOVE them!

Setting the STAGE:
One of my FAVORITE things to do before a transformation is to set the stage. I always send home an entry ticket to get the students interested and excited for the next day. For this transformation I added a letter of acceptance into the games and I really love how they turned out! = ) This note was sent home the day before the event and students were told to bring the ticket back the next day.

The Math Events:
The Luge, Curling, Speed Skiing, and Hockey

Items needed:
-Skates and Cones (I got both from our PE teacher.)
-Task cards/Recording page
-Stopwatch (We used our i-Pads)
How to play:
I set up two cones on one side of my classroom and two more at the other side. Task cards were scattered on the floor on the opposite side of my room behind the cones. One student would get on the skate/luge, and roll across the room to the task cards. Student had to keep his/her bottom on the luge and feet off the ground. Once the student made it to the task cards, they grabbed one, and brought it back across the room to the group. Another student timed how long it took the student to do this. Once task card was back to the group, the entire group worked together to solve it. After the card was solved, I'd come over and check it, and then the process would continue. Students continued the process and recorded their time each round. Students added up their best 6 times for their total "Luge" score.

Items needed:
-Cones (I got these from our PE teacher.) 
-Task cards/Recording page
-Stopwatch (We used our i-Pads)
-Two pieces of cardstock
How to play:
This game was set up in the hallway outside of my classroom.  I set up two cones about 15 feet away from each other. I hung an envelope with task cards next to the cone furthest away from my classroom. One student would jump onto two pieces of cardstock and "ski" down to the task card envelope. They'd grab a task card and then head around the cone, back to the starting line. If the student lost a ski, they had to go back to where the ski was before continuing. Another student timed how long it took the student to go down to the task card envelop and back. Once task card was back to the group, the entire group worked together to solve it. After the card was solved, I'd come over and check it, and then the process would continue. Students continued the process and recorded their time each round. Students added up their best 6 times for their total "Speed Skiing" score.


 Items needed:
-Wax Paper (with a target drawn on it)
-Pennies/Dimes
-Task cards/Recording page

How to play:
For this activity, students began by first working a task card. After the card was solved, I'd come over and check it. Once everyone had the correct work and answer, each student in the group would get one chance to "curl". Students would each grab a penny and slide it across the table and try to hit the target. After each student went, they totaled up how many points they earned for that round and recorded them on their recording page. You could also play this with two teams. The two teams would be trying to score points and knock each other's pennies/dimes off the game board.

 Items needed:
-Hockey Goal/Stick/Cones/Ball (I got everything from our PE teacher)
-Task cards/Recording Page
How to play:
For this activity, students began by first working a task card. After the card was solved, I'd come over and check it. Once everyone had the correct work and answer, each student in the group would get one chance to score a goal. Students would tally the points they made for that round, and then get back to work on the next task card. Students had to shoot from about 10 feet back from the goal.

Other Events/Activities:
* We started our transformation by breaking our kiddos into teams and they each made a team flag that they used for the entire two days. After teams were created and flags were made, we had our opening ceremonies and paraded around the school. Our assistant principal live streamed the parade on our school's Facebook page and interviewed our kiddos like they were actual Olympians. It was SO much fun.
*Virtual Breakout - The plan was to start out our Winter Games with this Olympic activity, but the internet was down, so we ended up doing this on the second day of our transformation.
*Reading/Stem Passages from Top Floor Teachers - This resources is incredible. This resources is packed full of passages about Winter Games events and each passage has a fun STEM project.

Points:

Throughout the course of the two days, students earned points for their teams. We tallied our points on a large scoreboard in our classroom. Students LOVED seeing real-time totals. Our class totals were then compared to the totals in other 5th grade classrooms at our school to determine who won the gold!
 
You can grab the task cards/entry tickets/directions I used over on my TPT store HERE.

This was by far one of my FAVORITE transformations I've done so far! You should totally give it a try in your own classroom! If you have any questions, please don't hesitate to reach out via commenting on this blog, or by sending me an email! Thanks! = )